Create the Console Connection -
- Login as an Administrator to the OCI console
- Navigate to Compute > Instances > then select your instance
- On the bottom left select Console Connections
- From a terminal run “cat ~/.ssh/id_rsa.pub” and copy it. If you have another public key you want to use, feel free to use it.
- Click on Create Console Connection
- Select the PASTE SSH KEYS option
- Paste the ssh public key into the field
- Click on the Create Console Connection button.
- Once it is Active select the three dots menu on the right and select Connect with SSH, alternately you could use Connect with VNC.
- Choose LINUX/MAC OS or WINDOWS and copy the command.
- In a text editor to make it easier and for insurance modify the command and add “-i ~/.ssh/id_rsa” in a couple places; replace id_rsa with your private key if it is different. For example the changes in red:
ssh -i ~/.ssh/id_rsa -o ProxyCommand='ssh -W %h:%p -i ~/.ssh/id_rsa -p 443 ocid1.instanceconsoleconnection.oc1.iad.abuwcljtb73kpfekbhmaf6j7qa56uorzbqtnej4jgviliiofkgfimgi5d3yq@instance-console.us-ashburn-1.oraclecloud.com' ocid1.instance.oc1.iad.abuwcljtjpcpb3ztejz7r5vaap3cpaznuryrdz6yhv3mejxhvalnd7e3ddoa
Access the instance via the Serial Console –
- From the previous steps paste the command that was copied and modified into a new terminal window and press enter.
- Press enter again and you should now see a prompt to login — DO NOT LOGIN.
- While watching your terminal with the login prompt, in the OCI console click on the Reboot button of your instance > choose confirm OK.
- You should see commands running across the terminal and once you see the OS options immediately use your up and down arrows to change the option. If you wait to long it will default to an option and continue to start. If that happens you will have to reboot again.
- For Linux select the Unbreakable Enterprise Kernel option and press “e” to edit.
- This is the tricky part. Scroll down using your keyboard down arrow to the very bottom. You should see the cursor in a lighter color; it can be hard to see, but trust me it is there.
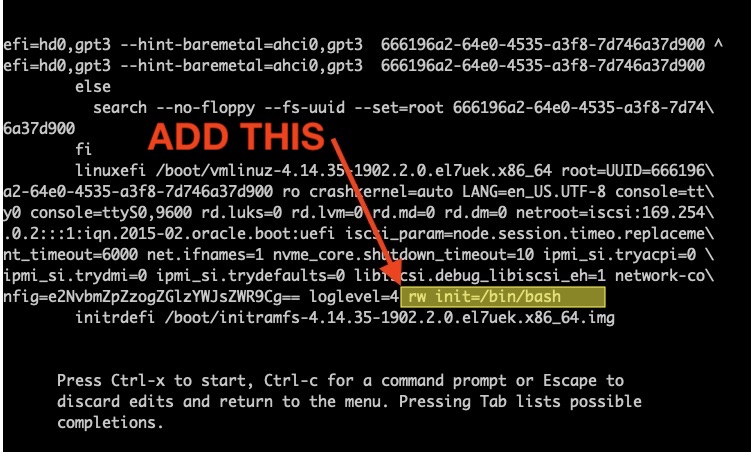
- Move the cursor until it is between the loglevel=4 and the last line ending in “initrdefi /boot/xxxxx.x86_64.img”.
- Insert “rw init=/bin/bash”, be sure there is a space between the two other lines (see below).

- Now press CTRL-X and it will reboot to a bash shell as root --- *** BE CAREFUL NOW ***.
Reset the OPC SSH key –
From the same terminal from the previous steps run the following:
- Execute "/usr/sbin/load_policy -i” - to preserve the SELinux policies for the files you will modify.
- Execute "/bin/mount -o remount,rw /“ - to remount the root partition with read/write permissions.
- Execute "cd ~opc/.ssh” - to change to the opc SSH key directory. If you run a ls command you should see one file authorized_keys. If you run “cat authorized_keys” it may be empty or the wrong key; mine was empty.
- Execute “mv authorized_keys authorized_keys.orig” - as a safety precaution to back up the original file.
- Execute “vi authorized_keys” - to create a new authorized_keys file.
- Press “i” to insert some text.
- Paste in your ssh public key used from the previous step when you created the console connection.
- Press ESC, enter “:wq”, and press Enter to write and quit the file to save it.
- Execute “chown opc:opc authorized_keys” to make sure the owner of the file is opc otherwise it will be owned by root.
- Execute “chmod 600 authorized_keys” to set the proper permissions.
- Execute "mount -o remount,ro /” to force the OS to flush the filesystem cache. It also guarantees that the filesystem is marked as "cleanly unmounted" when the machine comes back up from a reboot.
- Execute “/usr/sbin/reboot -f” to reboot the running instance.
- Next when you see the same OS options let the server start using the default OS option.
- After the instance has rebooted open a new terminal and try to ssh in using “ssh opc@myinstance”; change myinstance to your hostname. Another alternative is to provide the location to your private key like “ssh -i ~/.ssh/my_private_key opc@myinstance”.
- If successful you will get a login prompt; yeah!
Important, I recommend closing the terminal window with the serial connection and then deleting the Console Connection immediately using the OCI console. If you don't delete the serial console it will terminate your session automatically after 24 hours and you will have to re-authenticate, but the serial console will still be there. The risk is low since for someone to use this serial console they would need your private key, but as a precautionary measure it is best to delete the serial console as soon as you are finished using it.
No comments:
Post a Comment